Setting up#
Note
If you get stuck in the contribution process, send us a message on Slack and we’ll help you.
This is a general guide applicable to all our projects (JupySQL, Ploomber, sklearn-evaluation, ploomber-engine, etc.). However, there might be particular details in some repositories so check out the CONTRIBUTING.md (located in the root directory) for the project you want to contribute to.
For a more detailed introduction to open-source contributions, check out our blog post.
This guide will help you:
Configure your development environment (necessary for both code and documentation contributions)
Crete a local copy of the project you’ll contribute to
By the end of this tutorial, you’ll be able to make changes to the code (or documentation), and test them locally.
Pre-requisites#
Setting up your environment requires miniconda, once installed, verify it’s working with:
conda --version
If conda is activated, you should see (base) as the prefix of your terminal prompt.
You also need git, ensure it’s working by running the following:
git --version
Continue once conda and git are working.
Creating a conda environment#
Each Ploomber project you contribute we’ll live in a separate conda environment, so let’s first create a base environment to manage the others.
Create a ploomber-base environment:
conda create --name ploomber-base python=3.10 --yes
Activate the environment and install pkgmt:
conda activate ploomber-base
pip install pkgmt --upgrade
Verify installation:
pkgmt --help
If you don’t see any errors, continue. Otherwise, message us on Slack.
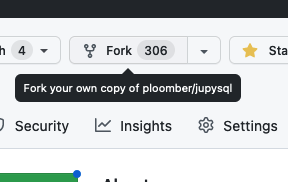
Forking and cloning the repository#
To contribute to one of our projects, you need to fork it by clicking on this button:
Then, click on Create fork:
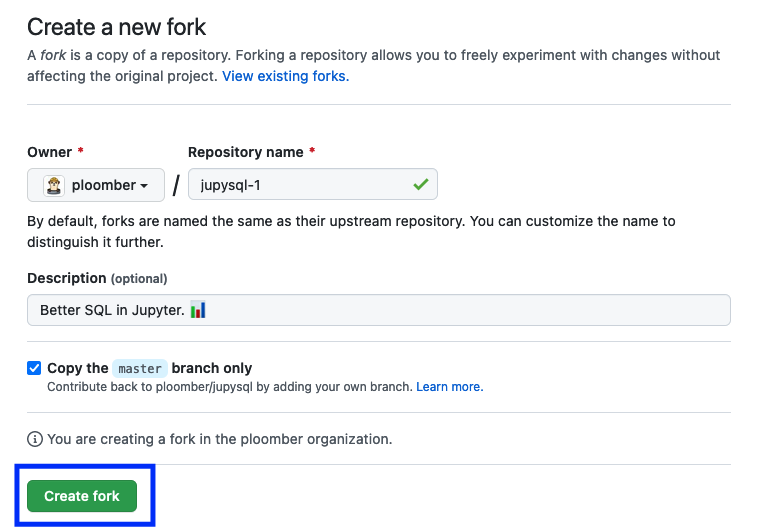
This will create a copy of the repository under your username:
https://github.com/YOUR_USERNAME/REPOSITORY_NAME
Once you forked it, use the terminal to clone the repository:
git clone https://github.com/YOUR_USERNAME/REPOSITORY_NAME
Setup#
Warning
Some of our projects have a tasks.py file in the root directory (e.g., Ploomber), if that’s the case for the project you want to contribute to, go to the next section
First, ensure your current directory is the folder where you cloned the repository. For example if using Linux or macOS:
cd REPOSITORY_NAME
Now, let’s setup your development environment. First, activate your base environment:
conda activate ploomber-base
Now, let’s install the dependencies:
# if you want to build the documentation locally, pass --doc
pkgmt setup --doc

# this command will create a conda environment for you
pkgmt setup
By the end of the pkgmt setup command, you’ll see something like this:
conda activate ENV_NAME
This is because the pkgmt setup command will create another conda environment that’s
configured to contribute to the project you forked.
Before continuing, ensure you activate the environment:
conda activate ENV_NAME
Note
You have to repeat this process for every project you contribute to. For example, if you start contributing to JupySQL, and then you are contributing to ploomber-engine, you’ll have to setup again.
Now, let’s check your fork and IDE settings.
Setup (projects with tasks.py)#
If the project you want to contribute has a tasks.py file, follow these instructions.
Let’s setup your development environment:
pip install invoke --upgrade

# if you want to build the documentation locally, pass --doc
invoke setup --doc

# this command will setup the development environment
invoke setup
By the end of the invoke setup command, you’ll see something like this:
conda activate ENV_NAME
This is because the invoke setup command will create another conda environment that’s
configured to contribute to the project you forked.
Before continuing, ensure you activate the environment:
conda activate ENV_NAME
Note
You have to repeat this process for every project you contribute to. For example, if you start contributing to JupySQL, and then you are contributing to ploomber-engine, you’ll have to setup again.
Verify your installation#
If you follow these instructions for setting up, the package will install in editable mode. Meaning any changes to the source code will be visible when you start a session.
To verify this you can run the following in your terminal:
python -c "import PACKAGE_NAME; print(PACKAGE_NAME)"
Change PACKAGE_NAME for the package you’re contributing to. Usually the name of
the repository is the name of the package, but there are exceptions, to ensure you
got the right name, navigate to the repository and open the src/ directory, the
folders there are the package names. For example, in JupySQL, we have sql/, and
tests/, so I can verify that JupySQL is installed in editable mode by running:
python -c "import sql; print(sql)"
If the package is in editable mode, you’ll see something like this:
<module 'sql' from '/path/to/cloned/repository/src/sql/__init__.py'>
If not, you’ll see something like this:
<module 'sql' from '/path/to/envs/tmp/lib/python3.X/site-packages/sql/__init__.py'>
If the package isn’t correctly installed, you’ll see:
ModuleNotFoundError: No module named 'sql'
If you encounter problems, message us on Slack.
Next#
Now, let’s check your fork and IDE settings.